Annotator
The Annotator is a module within our data pipeline that is responsible for enriching the processed radio data with additional meaningful information. For our application, we downloaded data from the FAA’s (Federal Aviation Administration) Releasable Aircraft Database and used it to add additional information to each packet.
This documentation will take you through the process of containerizing the annotator and running it locally, and then migrating it to AWS. If you aren’t sure what that means no worries there will explanations at each step.
1. Local: Containerizing & Running the Annotator
Key Terms:
Containerizing applications provides portability, allowing them to run consistently across different environments, and enables efficient resource utilization and scalability, making it easier to deploy, manage, and scale applications effectively. Containerizing applications using Docker provides additional advantages such as simplified packaging, distribution, and deployment. Docker allows for easy creation and management of containers, making it a popular choice for containerization due to its comprehensive tooling and ecosystem support.
💡 In this section will be containerizing and running the annotator program locally (on a personal computer and not in AWS). This will essentially take the data packets from the client program and supplement them with additional information from another data source (For our airplane tracker application, we downloaded data from the FAA’s (Federal Aviation Administration) Releasable Aircraft Database and used it to append additional information to each packet).
1. Prep for Containerization
- Navigate to the annotator’s directory (
aircraft-annotator) within the cloned repo. This entire section of setup will be performed within this directory. - Download the latest “Yearly Aircraft Registration Database” data from FAA’s (Federal Aviation Administration) Releasable Aircraft Database directly into the
aircraft-annotatordirectory. Unzip the downloaded files & runcleanup-data.shto clean the data.
Use the following commands to install
pipreqs(if not already installed) and auto-generate arequirements.txtfilepip install pipreqs
pipreqsCreate a file
Dockerfilein the annotator’s directory as below:FROM python:3.8-slim-buster
WORKDIR /aircraft-annotator/
COPY . .
# install required dependencies
RUN pip3 install -r requirements.txt
CMD python3 annotator.py .Create
build-docker.sh, a script for later use in building the docker image as below:#!/bin/sh
# script to build the nats-annotator image
docker build -t nats-annotator .Create
run-docker.sh, a script for later use in running the docker image, as below. Be sure to update the contents of the NATS_HOST and TOKEN as appropriate.TODO: UPDATE
#!/bin/sh
export NATS_HOST="<insert nats_host here>"
#in this format: nats://<TOKEN>@<AWS-NLB-External-IP>:4222
#ex:nats://TOKEN@a15d11836d0644f6da0d09cbd81fae4f-949e37ea0352e6ad.elb.us-west-2.amazonaws.com:4222
export TOKEN="<insert token here>"
docker run --network "host" --privileged -v /dev/bus/usb/dev/bus/usb \
-e NATS_HOST=${NATS_HOST} \
-e TOKEN=${TOKEN} \
nats-annotator:latest- See another example here: https://github.com/ml4wireless/adsb-nats/blob/1ec407770eaef76e089661c8
- Note: If using the minikube setup outlined in the Set Up phase of this documentation along with a Mac machine, you may need to define the NATS_HOST in the following alternative way:
export NATS_HOST=${NATS_HOST:-"docker.for.mac.host.internal:<port>"}
export TOKEN=${TOKEN:-"<token>"}
2. Containerization & Running
- Build a Docker image for the annotator (image name
nats-annotator) using the build script we created earlier:- Note: If it is your first time running the script, run
chmod +x run-docker.shto make it executable./build-docker.sh - Optional — Verify that the Docker build worked: use the command
docker imagesto list all available images, and make sure that the newnats-annotatorimage is listed
- Note: If it is your first time running the script, run
- Use the script
run-docker.shwe created earlier to start the execution of the container:- Note: If it is your first time running the script, run
chmod +x run-docker.shto make it executable./run-docker.sh
- Note: If it is your first time running the script, run
💡 You should next see continuous print statements/logs from the annotator program like "Published annotation ...".
💡 Now lets test our local containerized annotator with messages from the NATS server:
export NATS_HOST="<insert nats_host here>"
export TOKEN="<insert token here>"

# try subscribing to the stream of annotated data and you should get messages from the annotator on your console
nats sub -s $NATS_HOST "plane.loc.annotated"
Example Output:

Extras
Additional Useful Commands
- Additional Docker Commands
# **NOTE #to stop running
docker stop <container_id>  #find container id -> docker ps
2. AWS: Containerizing & Running the Annotator
The Annotator is a module within our data pipeline that is responsible for enriching the processed radio data with additional meaningful information. For our application, we downloaded data from the FAA’s (Federal Aviation Administration) Releasable Aircraft Database and used it to add additional information to each packet.
We will now be running the containerized Annotator on an AWS EC2 instance to integrate it with the rest of our NATS pipeline backbone. Running the Annotator in the cloud also ensures scalability to handle varying workloads and high availability by leveraging the cloud infrastructure, while running it locally limits scalability and may result in resource constraints.
Containerization
1. Create & Set up an EC2 Instance for the Annotator
An EC2 instance is a virtual server in the cloud provided by Amazon Web Services (AWS) as part of their Elastic Compute Cloud (EC2) service. It offers scalable computing capacity with configurable resources such as CPU, memory, storage, and networking capabilities, allowing users to deploy and run applications on virtual machines in the AWS cloud.
Sign in to your AWS console, navigate to the EC2 service and create a new EC2 instance called
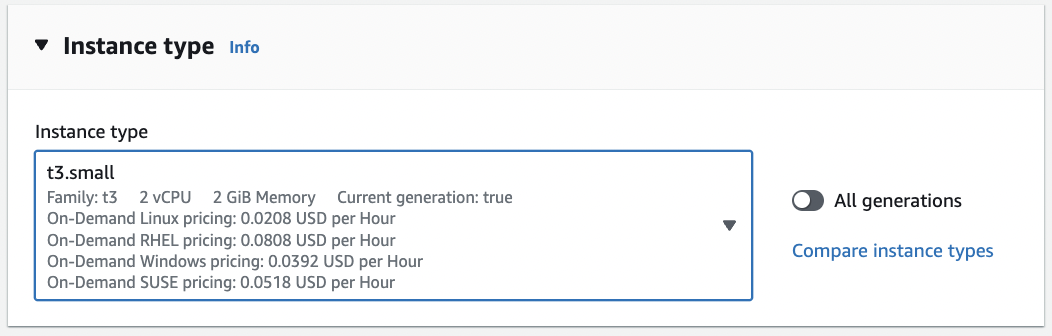
annotator-server- For the AMI & Instance type, we used
Amazon Linuxandt3.smallrespectively, with configurations as below: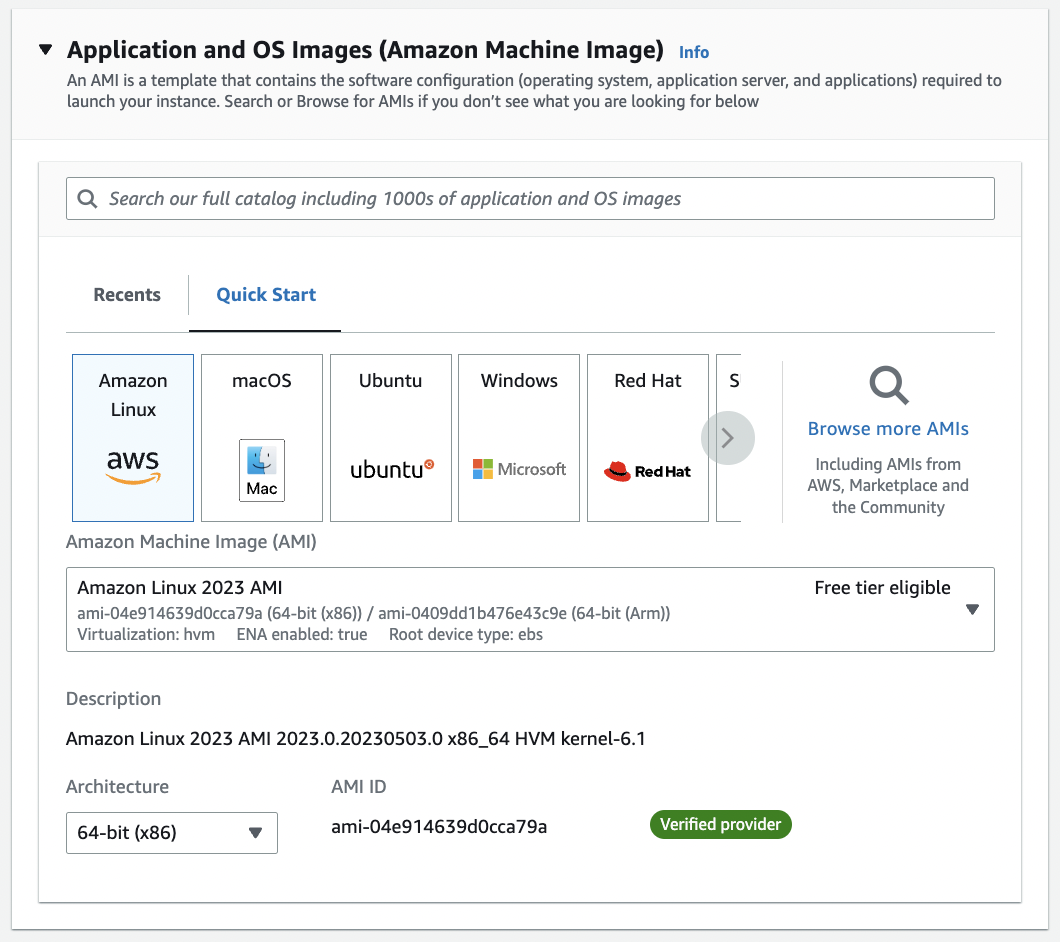
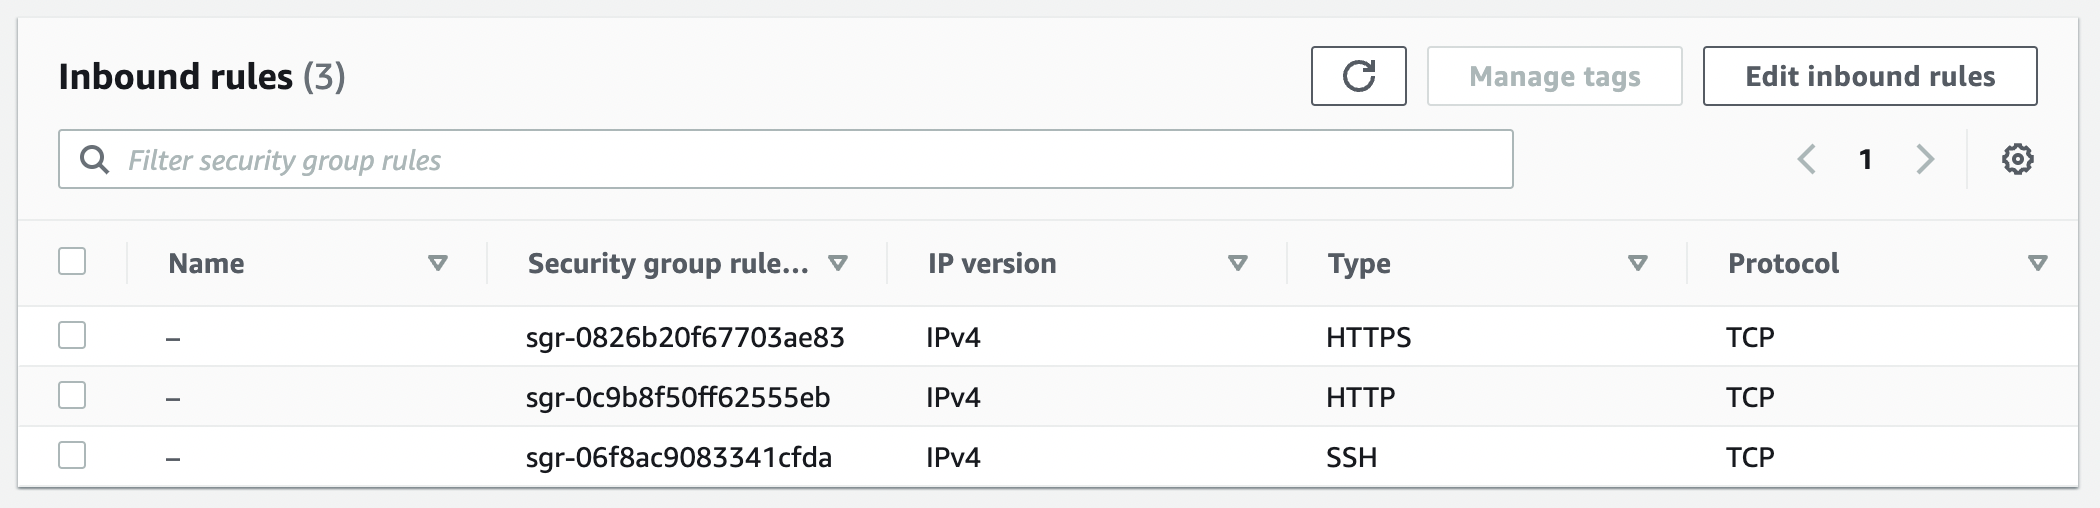
- You also will have to add a Key Pair, Security Group, and any other EC2 specifications. Reference our Security Group configurations below if needed-
- We created a new security group for the instance that allows port 22 (SSH) (and HTTP/HTTPS but not directly needed)
- Screenshots of the Inbound and Outbound rules for our Security Group are below:

- Make sure to link this Security Group with the
annotator-serverEC2 instance within its settings.
- Finally for the instance’s storage allowance, we kept the default setting as below:

- For the AMI & Instance type, we used
Proceed to install and set up docker on the EC2 instance:
# in EC2 terminal
# based on: https://www.cyberciti.biz/faq/how-to-install-docker-on-amazon-linux-2/

sudo yum update
sudo yum install docker
sudo usermod -a -G docker ec2-user
id ec2-user
newgrp docker
sudo systemctl enable docker.service
sudo systemctl start docker.service
sudo systemctl status docker.service
2. Collect the Annotator Data into an S3 Bucket
💡 In this section, we will go over how to move the locally downloaded files of data that are needed by the annotator into an S3 bucket to Reduce Docker Image Size. This way we do not need to store this data in our AWS EC2 instance, and it can be downloaded upon the execution of the container.
Create and Store Data in S3 Bucket
- Navigate to the S3 service within the AWS console and create a new S3 bucket
aircraft-annotator-data - Download the latest “Yearly Aircraft Registration Database” data from FAA’s (Federal Aviation Administration) Releasable Aircraft Database into any other directory on your computer (NOT the
aircraft-annotatordirectory since we want this directory to be lightwright). - Unzip the downloaded files & run
cleanup-data.shto clean the data. Upload the CLEANED data files into the S3 bucket we just created. - Follow the instructions in this link to make the data public and accessible.
Allowing the Annotator EC2 to access the S3 Bucket
Create an IAM role
- Look at this link to learn how to give EC2 access to S3
- Go to the EC2 instance page → Actions → Security → Modify IAM role and add the IAM role created
Create an IAM Policy
- Look at this link to write a policy for s3 access
Verify that the EC2 and s3 bucket are connected with the following command:
aws s3 ls s3://aircraft-annotator-data

# output should be something like:
# PRE ReleasableAircraft/
3. Prepare for Containerization — On Local Machine
💡 Complete this section on your local machine!
Navigate to the annotator’s directory (
aircraft-annotator). This entire section of setup will be performed within this directory.Use the following commands to install
pipreqs(if not already installed) and auto-generate arequirements.txtfilepip install pipreqs
pipreqsCreate a file
Dockerfilein the annotator’s directory as below:FROM python:3.8-slim-buster
WORKDIR /aircraft-annotator/
COPY . .
# install required dependencies
RUN pip3 install -r requirements.txt
RUN pip3 install awscli
# download annotator data from s3 bucket and execute annotator program
CMD aws s3 cp s3://aircraft-annotator-data/ReleasableAircraft . --recursive; python3 annotator.py .Create
build-docker.sh, a script for later use in building the docker image as below:#!/bin/sh
# script to build the nats-annotator image
docker build -t nats-annotator .Create
run-docker.sh, a script for later use in running the docker image, as below. Be sure to update the contents of the NATS_HOST and TOKEN as appropriate.TODO: UPDATE
#!/bin/sh
export NATS_HOST="<insert nats_host here>"
#in this format: nats://<TOKEN>@<AWS-NLB-External-IP>:4222
#ex:nats://TOKEN@a15d11836d0644f6da0d09cbd81fae4f-949e37ea0352e6ad.elb.us-west-2.amazonaws.com:4222
export TOKEN="<insert token here>"
docker run --network "host" --privileged -v /dev/bus/usb/dev/bus/usb \
-e NATS_HOST=${NATS_HOST} \
-e TOKEN=${TOKEN} \
nats-annotator:latest- See another example here: https://github.com/ml4wireless/adsb-nats/blob/1ec407770eaef76e089661c8
- Note: If using the minikube setup outlined in the Set Up phase of this documentation along with a Mac machine, you may need to define the NATS_HOST in the following alternative way:
export NATS_HOST=${NATS_HOST:-"docker.for.mac.host.internal:<port>"}
export TOKEN=${TOKEN:-"<token>"}
4. Transfer files from Local Machine to EC2 Instance
Delete any FAA data files from the local
aircraft-annotatordirectory, now that they are stored and retrievable from the S3 bucketFind and record your
annotator-serverEC2’s hostname from the AWS Console- Go to this instance’s page in the AWS Console and click ‘Connect’. On the “Connect to Instance” page, navigate to the “SSH Client” tab and copy the EC2 hostname from command at the bottom, under “Example”
- for example:

Use SCP to copy the local
aircraft-annotatordirectory to the EC2 instance:# in LOCAL terminal copy local files into EC2 using SCP - replace key filename, paths, ec2 hostname as needed
scp -i <key_filename> -r <local_path_to_aircraft-annotator_directory> <ec2_hostname>:~/annotator-dir
#---------- examples ---------------------------
# scp -i annotator-new.pem -r /Users/johndoe/Documents/GitHub/adsb-nats/aircraft-annotator ec2-user@ec2-35-86-207-137.us-west-2.compute.amazonaws.com:~/annotator-dir
Running
5. Running the Containerized Annotator on AWS
- Connect to the
annotator-serverEC2 instance via SSH- For instructions, go to this instance’s page in the AWS Console and click ‘Connect’. On the “Connect to Instance” page, navigate to the “SSH Client” tab and copy the command at the bottom, under “Example”
- Build a Docker image for the annotator (image name
nats-annotator) using the build script we created earlier:- Note: If it is your first time running the script, run
chmod +x [run-docker.sh](http://run-docker.sh)to make it executable./build-docker-aws.sh - Optional Check: use the command
docker imagesto list all available images, and make sure that the newnats-annotatorimage is listed
- Note: If it is your first time running the script, run
- Create a screen session to use to keep the annotator program executing in the background:
- otherwise it will stop annotating the data the second you exit the program
# in EC2 terminal
screen -S <session_name>
- otherwise it will stop annotating the data the second you exit the program
- Use the script
run-docker.shwe created earlier to start the execution of the container:- Add in your token in the run-docker.sh by using vim commands in the EC2
- Note: If it is your first time running the script, run chmod +x run-docker.sh to make it executable
./run-docker.sh - You should first see confirmation of the annotator data being downloaded from the s3 bucket
- You should next see continuous print statements/logs from the annotator program like "Published annotation ..."
- Detach the Screen session (keeps the annotator program running in the background even if you exit the terminal)
- press
ctrl + a + dto detach it -> you are now done (you may have to try doing this multiple times for it to work) - Optional Check: To make sure the screen session was created and detached, use the command
screen -list. You should see something like this-
- press
💡 Now lets test our containerized annotator with messages from the NATS server. Run the following command on your local terminal to hopefully see the stream of annotated messages from the Annotator module working on cloud.
export NATS_HOST="<insert nats_host here>"
export TOKEN="<insert token here>"

# try subscribing to the stream of annotated data and you should get messages from the annotator on your console
nats sub -s $NATS_HOST "plane.loc.annotated"
Example Output:

Extras
Additional Useful Commands
Additional Docker Commands
# **NOTE #to stop running
docker stop <container_id>  #find container id -> docker ps
Additional Screen Commands
#SCREEN DEBUGGING HELP:

screen -list # list sessions

# re-attach to a detached session
screen -r session_name # run if needed

#kill all sessions:
pkill screen

# kill a session:
screen -r <session_name> # to first re-attach to the screen session
Then press `ctrl + a` and then `k` and press `y` when it asks if you really want to kill the session